Week 4: Electronic Dice Machine
Project Overview
For this week’s challenge, I set out to design, build, program, and test an electronic dice machine using an Arduino, seven LEDs, and a push-button. My goal was to replicate the experience of rolling a physical die, with the Arduino generating a random value from 1 to 6 each time the button was pressed. As simple as the idea sounded, getting everything to work smoothly was definitely a challenge. I had to troubleshoot wiring issues, rethink my LED layout, and refine the timing in my code just to make sure the correct pattern lit up for each number. After a lot of testing—and retesting—I finally reached a point where pressing the button triggered a clean dice roll: the LEDs flashed the correct pattern, stayed illuminated briefly, and then cleared themselves for the next try. This project pushed my patience, but seeing it finally work made the struggle worth it.
Code
//Dice Led Lights
int button = 2;
//LED for DICE
int bottomLeft = 3;
int middleLeft = 4;
int upperLeft = 5;
int middle = 6;
int bottomRight = 7;
int middleRight = 8;
int upperRight = 9;
int state = 0;
long randNumber;
//Initial setup
void setup(){
pinMode(bottomLeft, OUTPUT);
pinMode(middleLeft, OUTPUT);
pinMode(upperLeft, OUTPUT);
pinMode(middle, OUTPUT);
pinMode(bottomRight, OUTPUT);
pinMode(middleRight, OUTPUT);
pinMode(upperRight, OUTPUT);
pinMode(button, INPUT);
Serial.begin(9600);
randomSeed(analogRead(0));
}
void loop(){
//Read our button if high then run dice
if (digitalRead(button) == HIGH && state == 0){
state = 1;
randNumber = random(1, 7);
delay(100);
Serial.println(randNumber);
if (randNumber == 6){
six();
}
if (randNumber == 5){
five();
}
if (randNumber == 4){
four();
}
if (randNumber == 3){
three();
}
if (randNumber == 2){
two();
}
if (randNumber == 1){
one();
}
delay(5000);
clearAll();
state = 0;
}
}
//Create a function for each "side"
void six()
{
digitalWrite(bottomLeft, HIGH);
digitalWrite(middleLeft, HIGH);
digitalWrite(upperLeft, HIGH);
digitalWrite(bottomRight, HIGH);
digitalWrite(middleRight, HIGH);
digitalWrite(upperRight, HIGH);
}
void five()
{
digitalWrite(upperLeft, HIGH);
digitalWrite(bottomLeft, HIGH);
digitalWrite(middle, HIGH);
digitalWrite(upperRight, HIGH);
digitalWrite(bottomRight, HIGH);
}
void four()
{
digitalWrite(upperLeft, HIGH);
digitalWrite(bottomLeft, HIGH);
digitalWrite(upperRight, HIGH);
digitalWrite(bottomRight, HIGH);
}
void three()
{
digitalWrite(upperLeft, HIGH);
digitalWrite(middle, HIGH);
digitalWrite(bottomRight, HIGH);
}
void two()
{
digitalWrite(bottomRight, HIGH);
digitalWrite(upperLeft, HIGH);
}
void one(){
digitalWrite(middle, HIGH);
}
void clearAll(){
digitalWrite(bottomLeft, LOW);
digitalWrite(middleLeft, LOW);
digitalWrite(upperLeft, LOW);
digitalWrite(middle,LOW);
digitalWrite(bottomRight, LOW);
digitalWrite(middleRight, LOW);
digitalWrite(upperRight, LOW);
}
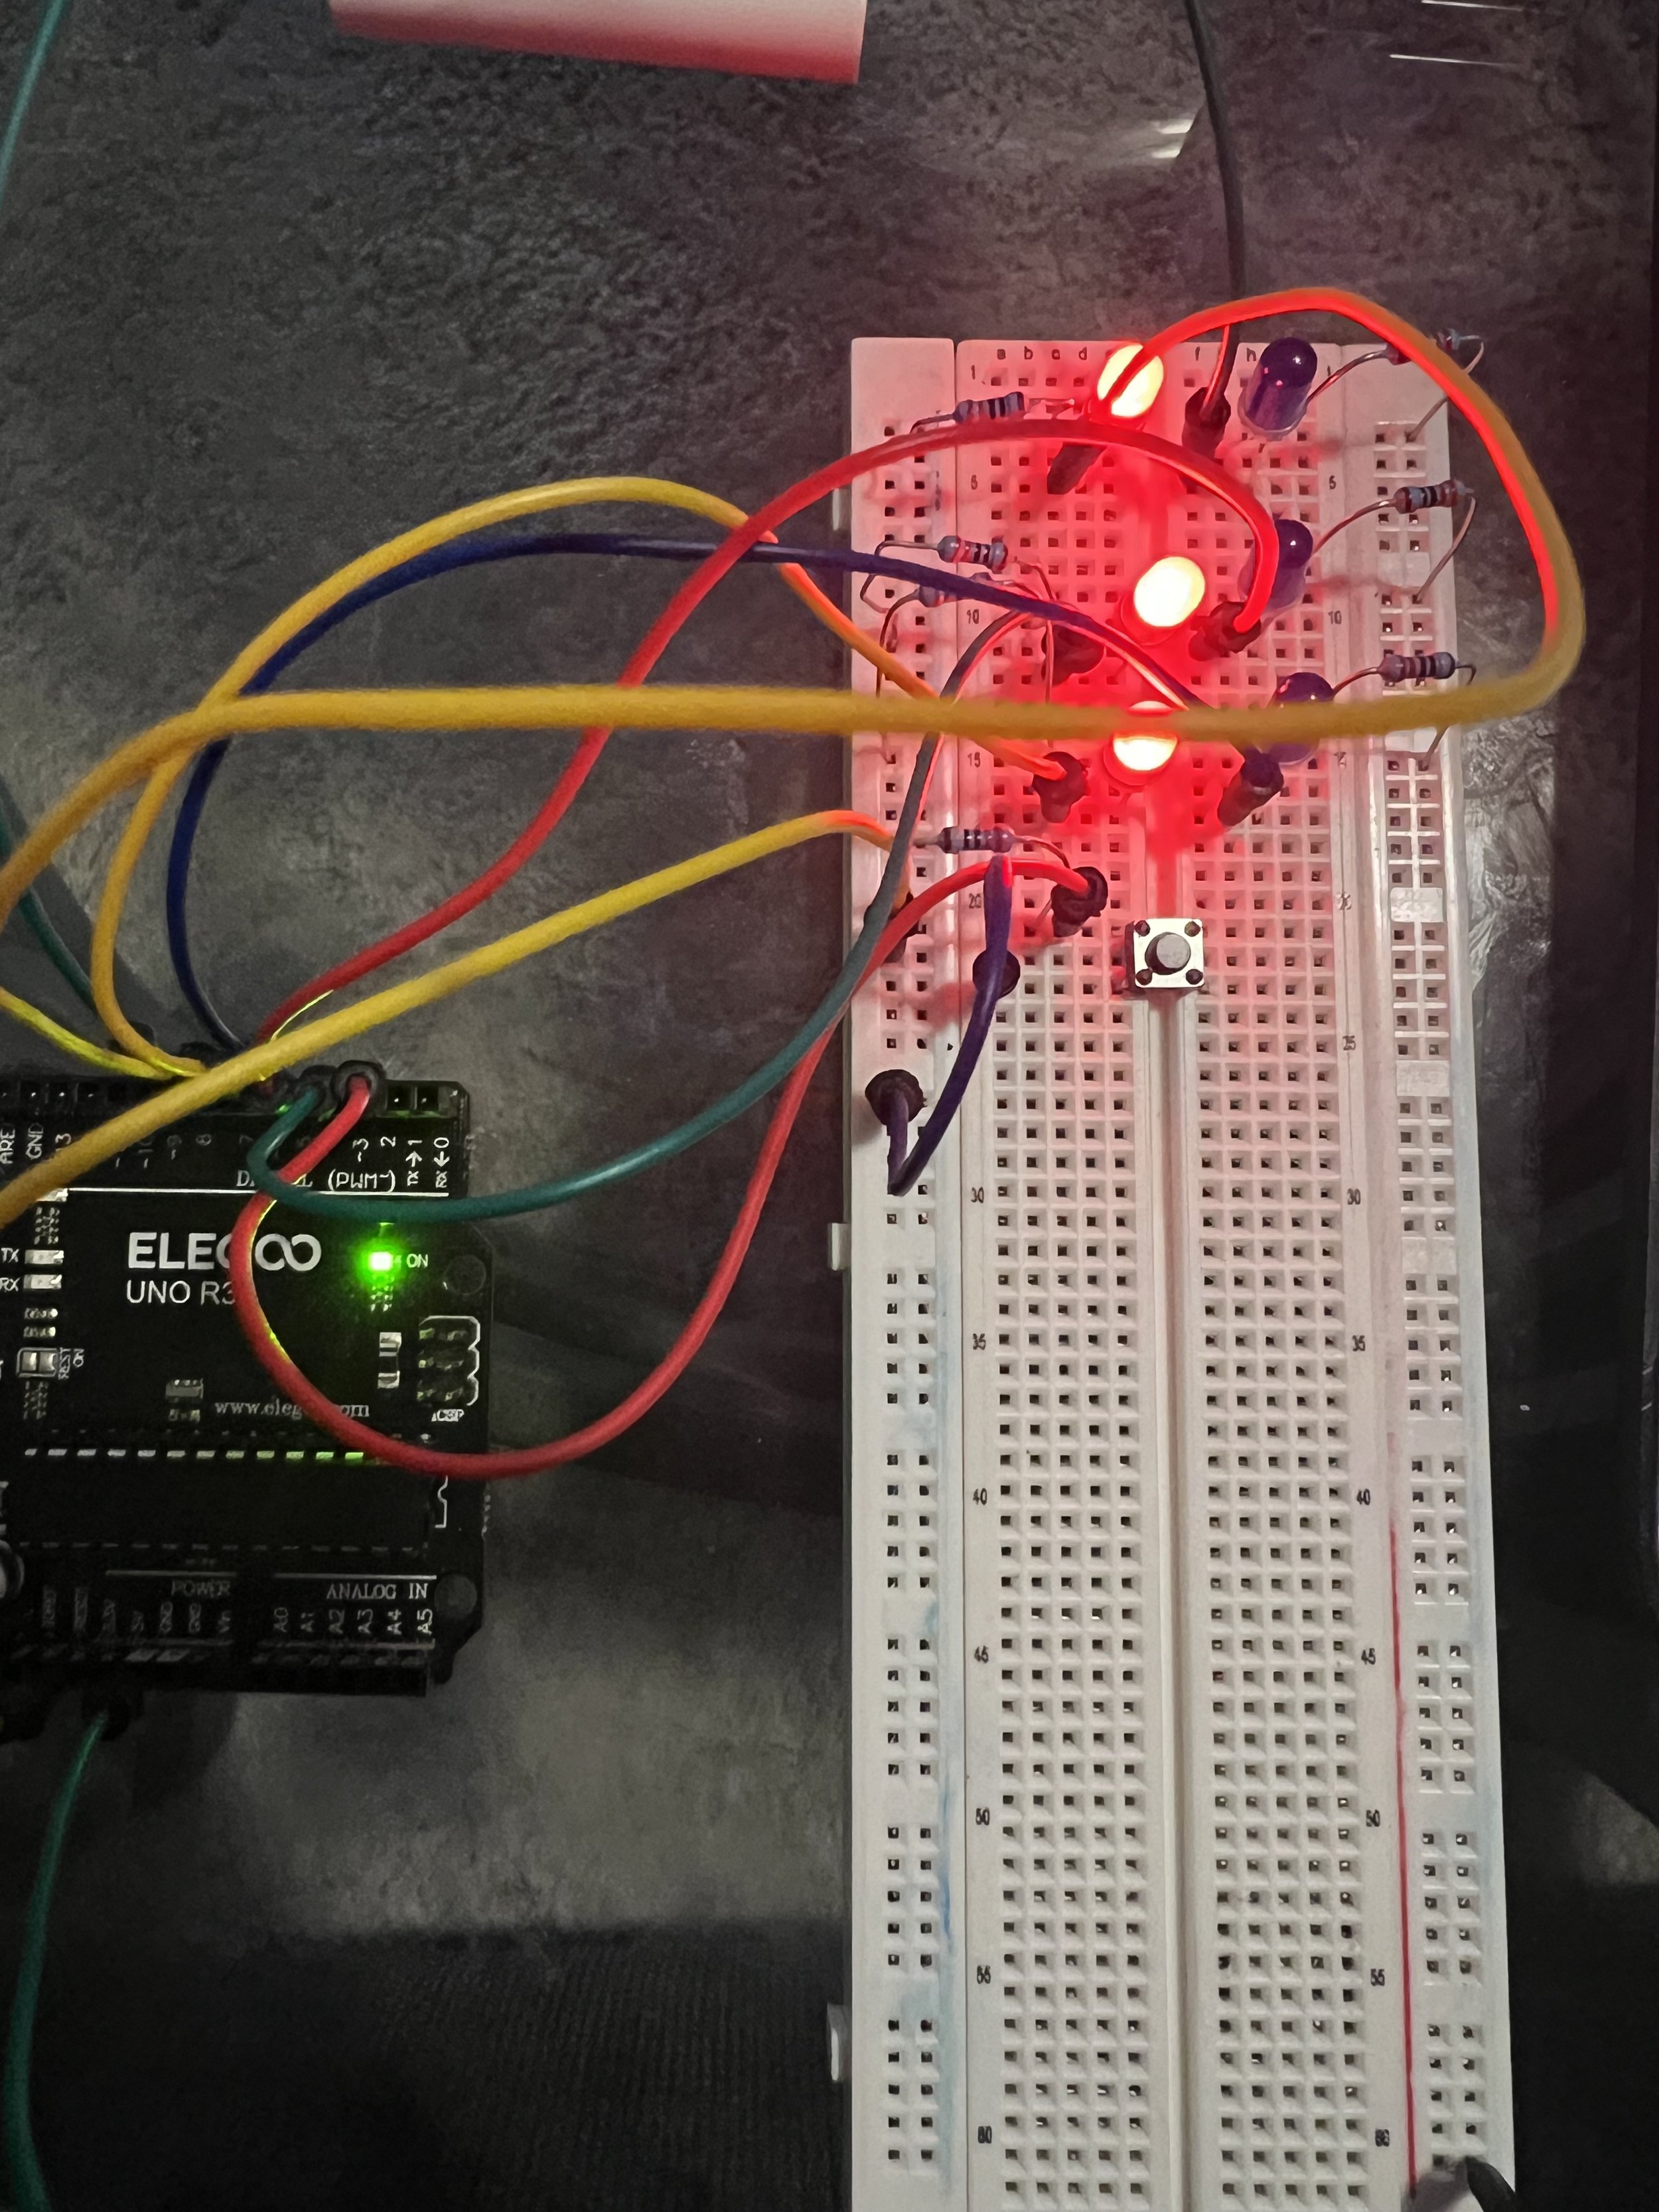
Picture of the Circuit
Project Video
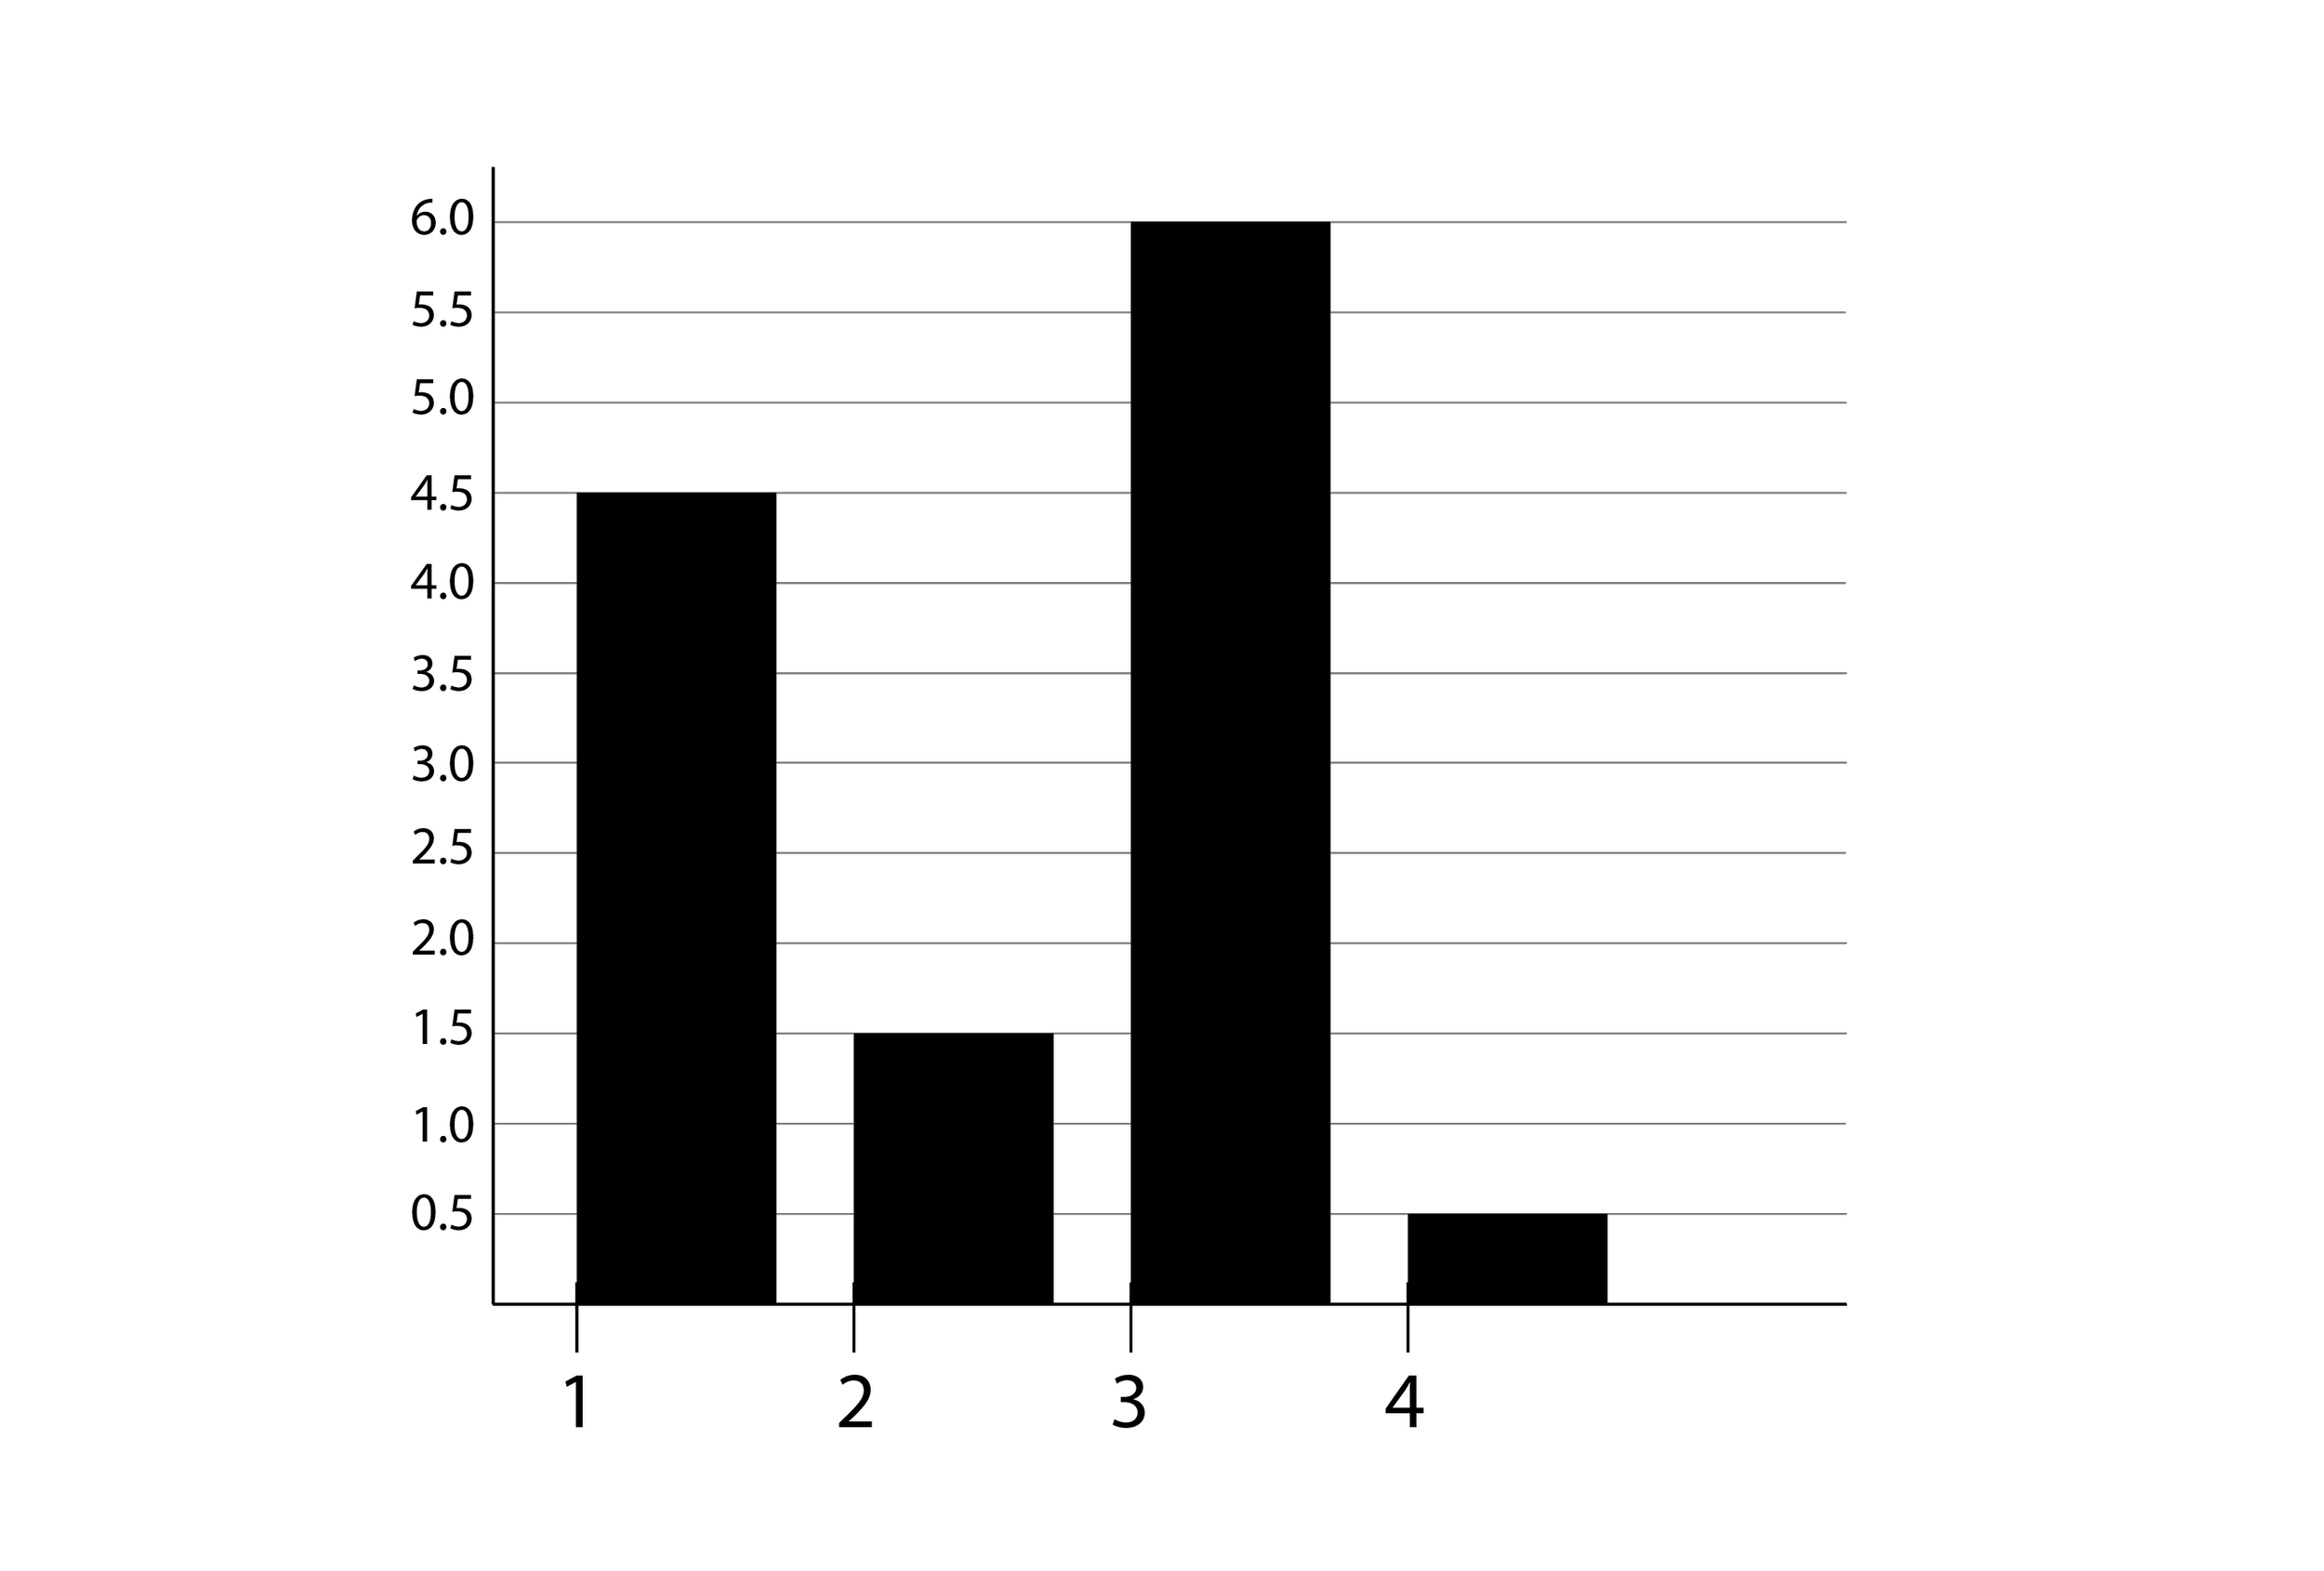
Distribution of Electronic Dice Rolls
Design & Thinking Process
1. Define & Plan
I started by clarifying exactly what I wanted my electronic dice to do: when I press a button, the Arduino should pick a random number from 1 to 6, and the LEDs should display the corresponding face of a real die. I sketched out how the seven LEDs would be arranged (in the classic “H” pattern) so I could represent every die face. I also made a list of the parts I needed — the Arduino board, seven LEDs, resistors, a push-button, wires — and thought through how I’d wire everything up on a breadboard.
2. Prototype & Circuit Building
Next, I built a rough version of the circuit on a breadboard. I arranged the LEDs in the H-shape, connected each one to a digital pin on the Arduino, and hooked up the push-button. I added resistors to protect the LEDs and to make sure I had a stable, reliable button input. During this stage, I made a few wiring mistakes — some LEDs weren’t lighting as expected — so I spent time debugging connections and reworking parts of the layout.
3. Programming
Once the hardware was in place, I moved to writing the code. I programmed the Arduino to use a random-number function to pick a value between 1 and 6 when the button is pressed. Then I mapped that value to specific LED patterns to recreate each die face. I also wrote logic so that once the value is displayed, the LEDs stay lit for a short duration and then reset, ready for the next roll.
4. Test, Refine & Iterate
Finally, I tested the entire system over and over. I pressed the button a bunch of times to make sure the dice rolls felt random and the lighting was correct for each number. Whenever something went wrong — an LED wouldn’t light, or two lit up when they shouldn’t — I went back into the code or rewired the circuit. I tweaked the timing in my delay functions so the LEDs stayed on just long enough, but not too long. Through testing, I refined both the hardware layout and the program until the dice roll felt smooth and reliable.
Final Reflection
As I wrap up this dice LED lights project, I feel a strong mix of satisfaction and lessons learned. When I started, it seemed like a straightforward task: press a button, generate a random number, light up the LEDs. But as soon as I began wiring, programming, and testing, I realized how many variables there were — each one capable of derailing the whole system.
One of the biggest take-aways for me was how much debugging hardware can differ from debugging software. At first, I struggled with inconsistent LED patterns. Was it my logic in code, or simply a misplaced wire or resistor? I spent more time on the breadboard than I ever expected, re-routing connections, double-checking pin assignments, and verifying that each LED was properly grounded. It was tedious, but every little fix taught me something: the importance of clean wiring, good labeling, and methodical testing.
On the programming side, I learned that randomness and timing aren’t trivial. I had to fine-tune how the Arduino generated random values, how long LEDs stayed lit, and how to reset the system smoothly for the next roll. I experimented with different “delay” times to find a balance between fast response and a natural, dice-like feel. I also realized that even small changes in seed generation (how the random() function is seeded) could affect how random the outcome felt.
Beyond the technical hurdles, this project also challenged my patience and resilience. There were times when a test failed, and I wondered whether I’d misread my own wiring diagram or made a logic error. It forced me to take a step back, break down the problem, and tackle it one component at a time.
However, when it finally worked — when I pressed the button and saw the correct LED pattern for each “roll,” then watched it clear and reset cleanly — I felt a deep sense of accomplishment. That moment made all the frustration worthwhile.
Looking ahead, I see a lot of potential to expand on this. I could add sound using a buzzer, or include an accelerometer so the dice “shake” before showing a number. I might even build a small casing to make the setup more like a real die. But more importantly, this project reaffirmed how valuable hands-on prototyping is. You can read about LED dice projects on sites like Instructables, but actually building one teaches you in a very different way.
In the end, this project wasn’t just about simulating a die — it was about understanding systems, embracing failure, and refining both hardware and software until they work in harmony. And that’s a win for me.